

搜索到
114
篇与
EN
的结果
-

-
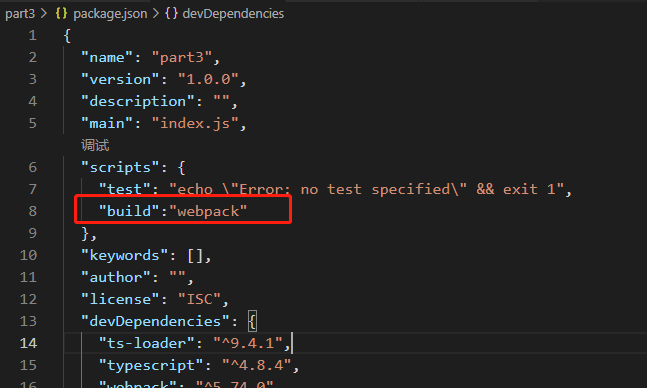
typescript 使用webpack打包ts代码 初始化npm init -y安装cnpm(可跳过)npm install -g cnpm --registry=https://registry.npm.taobao.org安装webpackcnpm i -D webpack webpack-cli typescript ts-loader创建webpack.config.js,进行配置const path = require("path"); //webpack中的所有的配置信息都应该写在这里 module.exports = { // 指定入口文件 entry:"./src/index.ts", //指定打包文件所在的目录 output : { //指定打包文件的目录 path : path.resolve(__dirname,"dist"), //打包后文件的名字 filename : 'bundle.js' }, // 指定webpack打包时要是使用的模块 module:{ rules : [ { //指定规则生效的文件 test: /\.ts$/, // 要是有的loader use : 'ts-loader', // 要排除的文件 exclude:/node-modules/, } ] } }创建tsconfig.json,进行配置{ "compilerOptions": { "module": "es2015", "target": "es2015", "strict": true, } }在webpake.json增加打包命令 "scripts": { "test": "echo \"Error: no test specified\" && exit 1", "build":"webpack" },在终端执行打包 npm run build成功,dist文件夹下出现编译后的bundle.js文件
-
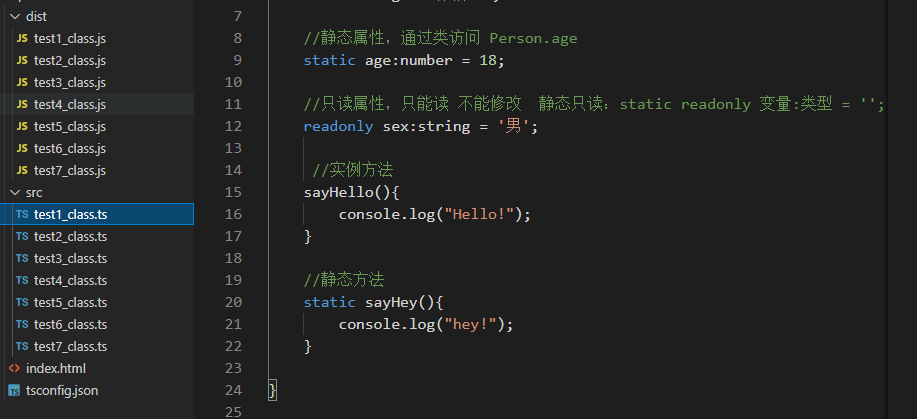
typescript 配置文件 tsconfig.json 在目录创建tesconfig.json{ /* ts编译器的配置文件 include 包含,哪些ts文件需要被编译 ** 任意目录 、*任意文件 exclude 不包含,哪些文件不需要被编译 extends 继承 files 包含的文件。 compilerOptions 编辑器选项 */ // "include": ["./src/**/*"], // "exclude": [], //"files": [], "compilerOptions": { //指定ts被编译为js的es版本 . ESNext = es的最新版本 "target": "es3", //指定要使用的模块化的规范 "module": "es2015", //浏览器中要使用的库 //"lib": ["dom","es6"] //指定编译后文件所在的目录 "outDir": "./dist", //将代码合并到一个文件 // "outFile": "./dist/app.js", //module = system // 是否对js文件进行编译 "allowJs": false, // 是否检查js代码是否符合语法规范 "checkJs": false, // 是否移除注释 "removeComments": false, //不生成编译后的文件 "noEmit": false, //有错误时,不生成编译后的文件 "noEmitOnError": false, //所有严格检查的总开关 "strict": false, //设置编译后的文件是否使用严格模式 use strict "alwaysStrict": false, //不允许隐式的any类型 "noImplicitAny": false, //不允许不明显类型的this "noImplicitThis": false, //严格的检查空值 "strictNullChecks": false, } }
-
typescript 数据类型 //声明一个变量a,指定他的类型是number ,在之后的使用过程中,他只能是数字 let a :number; a = 10; console.log(a); //声明变量时,进行赋值 let c : boolean = false; //如果对变量声明同时进行,TS可以自动对变量进行类型检测 let d = false; //d = 123; 报错 function sum(a,b){ return a+b; } console.log( sum(123,456) ); // 579 console.log( sum(123,"456") ); // 123456 //限制参数类型 function sumTs( a:number , b:number ){ return a+b; } console.log( sumTs(123,456) ); // 579 //console.log( sumTs(123,"456") ); // 报错@ //限制 参数类型 , 返回值类型 function sumTs2( a:number , b:number ) :number{ return a+b; } // 直接使用字面量进行类型生成 let a : 10; // a = 11; 报错 // b可以是 male 或 female (联合类型) let b : "male" | "female"; // c 可以是 boolean 类型 也可以是 string 类型 let c : boolean | string; c = true; c = "hello"; // any 表示的是任意类型,(关闭ts对变量的类型检测,不建议使用) let d : any; d = 10; d = false; d = 'hello'; //声明变量不指定类型, 默认为any let d1; //unknown 表示未知类型的值 unknown是一个类型安全的any let e : unknown; e = 10; e = 'hello'; e = false; let s:string; // 类型断言, 告诉解析器变量的实际类型 s = e as string; s = <string>e; function fn():boolean{ return true; } //void 空值 function fn1(): void { console.log("没有返回值"); } //never 永远不会有返回结果 function fn2(): never { throw new Error("报错了!"); } let a : object; a = {}; a = function(){}; let b:{ name:string }; //b = {}; @报错 b = { name : '张三'}; // 必须指定name //b = { name : '张三' ,age:18}; // @报错 定义时没有定义 age //在变量后面加个? 表示 可选的 let c:{ name:string ,age?:number }; c = { name : '张三'}; c = { name : '张三',age :19}; //表示,对象d中要有一个name属性,其他的属性、类型不限制 let d:{name:string,[propName:string]:any} d = { name : '张三',a:'123',b:true,c:19}; //e 有两个参数,类型是number,返回也是number //设置函数的类型声明 let e:(a:number,b:number)=>number; e = function ( n1:number , n2:number ):number { return n1+n2; } // string[] 表示字符串数组 let f: string[]; f = ['a','b','c']; // Array<number> 表示数值类型的数组 let g:Array<number>; g = [1,2,3]; // 元组:固定长度的数组 存储效率高 // h 有两个值,第一个类型是string 第二个也是string let h:[string,string]; // enum 枚举 enum Gender { Male = 0, Female = 1, } let i:{ name:string , gender:Gender } i = { name:'孙悟空', gender:Gender.Male } // | : 或 let j:string | number; // & :与 let k:{name:string} & {age:number}; k = {name:'张三' , age : 18}; //类型别名 type myType = string; let m : myType; type myType2 = 1|2|3|4|6; let n : myType2;
-
-
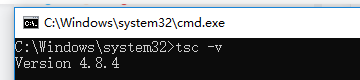
tsc 在vscode中无法运行 {mtitle title=" 问题描述 "/}操作系统:windows在cmd中可执行在vscode中报错{mtitle title=" 解决方案 "/}以管理员身份运行 PowerShell,并执行命令set-ExecutionPolicy RemoteSigned将PowerShell的执行策略更改为RemoteSigned具体步骤如下:① 使用 win+x 快捷键,会出现如下弹窗,鼠标左键单击Windows PowerShell 即可打开shell.② 运行 set-ExecutionPolicy RemoteSigned 命令,在询问更改执行策略的时候选择敲Y或者A③ 运行 get-ExecutionPolicy 命令,可看到脚本的执行策略已被更改为 RemoteSigned ④ 回到vscode的终端,输入命令 tsc -v 不再报错,也可对ts文件进行编译。 {mtitle title=" 产生原因 "/}PowerShell的默认执行策略是 Restricted,它禁止运行任何脚本和配置文件。故需更改PowerShell的设置来解决刚遇到的问题转自:https://blog.csdn.net/Jadon_z/article/details/126754604
-
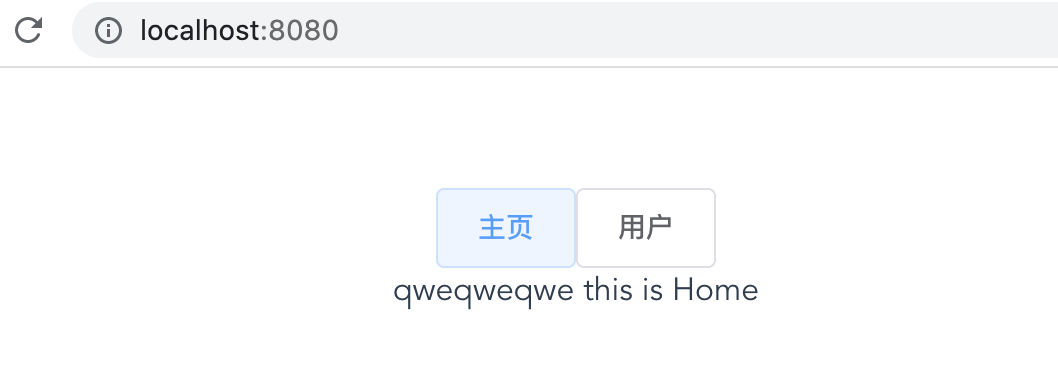
vue前端开发笔记6 - 路由 - 切换路由/页面 创建 views/Home.vue创建 views/User.vue在App.vue中放置以下代码<router-link to="/"> <el-button>主页</el-button> </router-link> <router-link to="/User"> <el-button>用户</el-button> </router-link> <router-view></router-view>在router/index.js中添加路由配置const routes = [ { path:"/", name:'Home', //component: Home, component: () => import('../views/Home.vue') }, { path:"/User", name:'User', component: () => import('../views/User.vue') } ]{dotted startColor="#ff6c6c" endColor="#1989fa"/}{mtitle title="效果"/}{x} 主页 (默认或点击主页按钮) :展示 views/Home.vue 中的内容 {x} 用户 (点击用户按钮): 展示 views/user.vue 中的内容
-
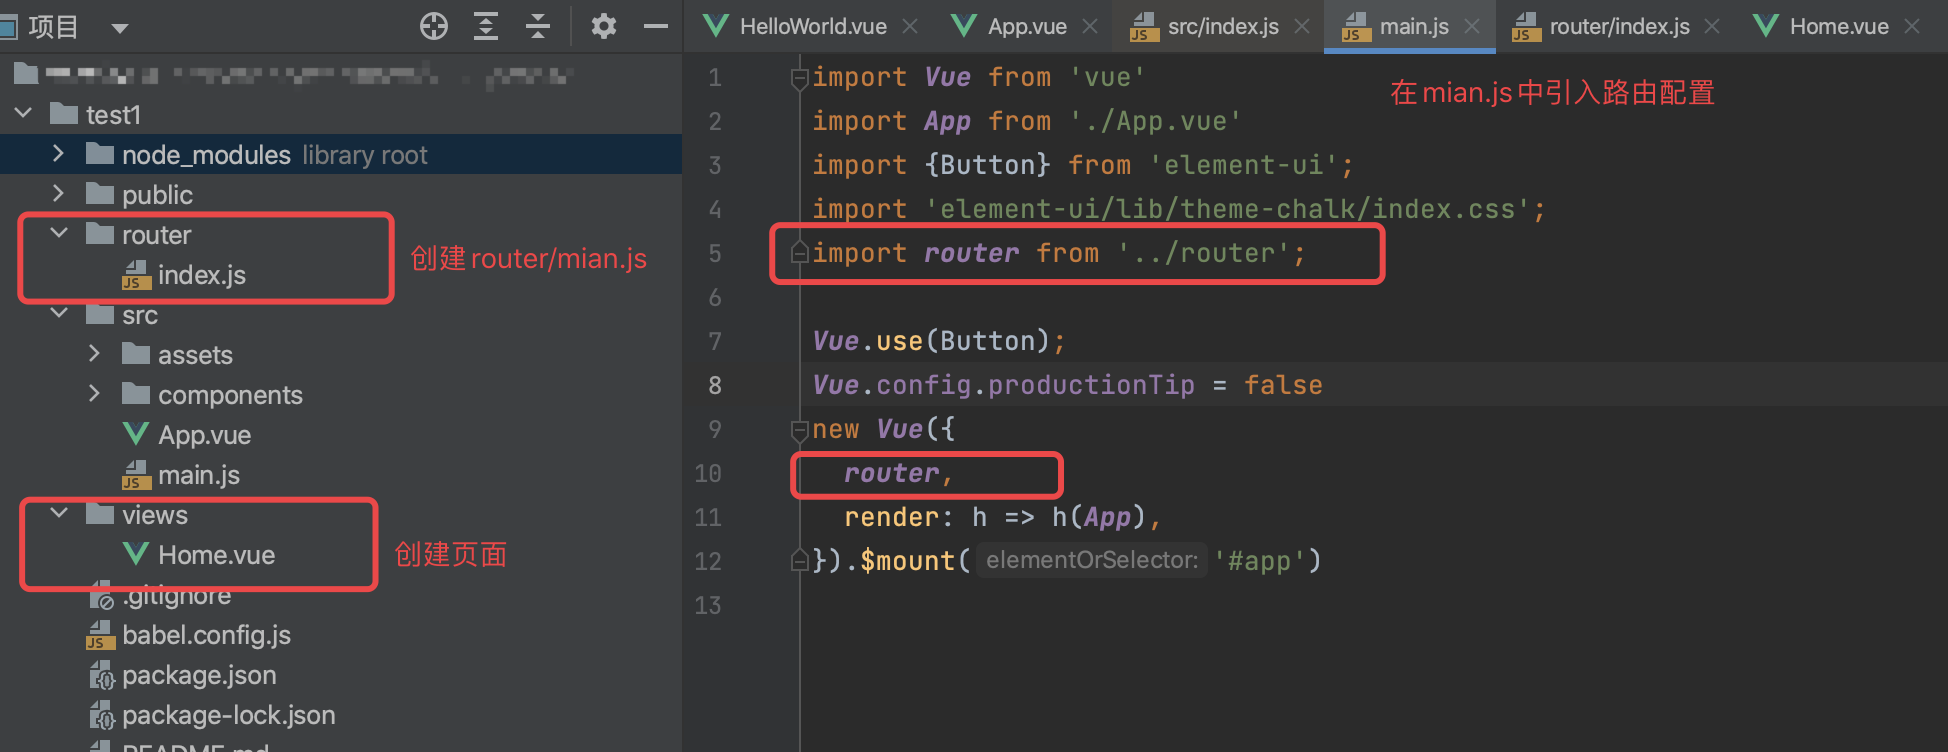
vue前端开发笔记5 - 路由的安装与基本使用 1.安装引入npm i vue-router@3.2.0 @3.2.0 表示指定版本2.在mian.js中引入import Vue from 'vue' import App from './App.vue' import {Button} from 'element-ui'; import 'element-ui/lib/theme-chalk/index.css'; import router from '../router'; Vue.use(Button); Vue.config.productionTip = false new Vue({ router, render: h => h(App), }).$mount('#app') 如图3.在router/index.js中写配置import Vue from 'vue' import VueRouter from 'vue-router' //import Home from '../views/Home.vue' Vue.use(VueRouter) const routes = [ { path:"/", name:'Home', //component: Home, component: () => import('../views/Home.vue') } ] const router = new VueRouter({ mode:'history', routes }) export default router如图:4.在App.vue中引入router-view<router-view></router-view> {x} 访问首页,会出现 views/Home.vue 中的内容<router-view></router-view> 内容会随 浏览器路由 在 router/index.js 中 routes 匹配对应的页面如图:【常见问题】router-view不显示内容怎么办?{x} 检查 router/index.js 中的 const routes = [{}] { } 不要写成 const routers = [{}] {x} 是routes而不是routers
-
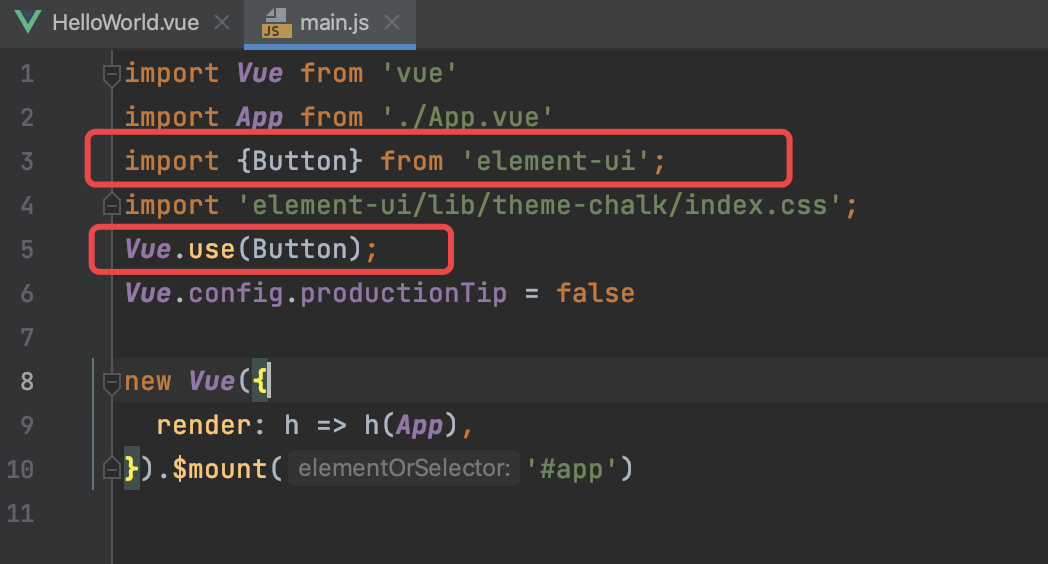
vue前端开发笔记4 - 组件按需引入 按需引入的优势:缩小打包之后的文件体积安装插件npm install babel-plugin-component -D修改配置文件 ( babel.config.js )module.exports = { presets: [ '@vue/cli-plugin-babel/preset' ], "plugins": [ [ "component", { "libraryName": "element-ui", "styleLibraryName": "theme-chalk" } ] ] } 修改引入import {Button} from 'element-ui'; import 'element-ui/lib/theme-chalk/index.css'; Vue.use(Button);如图:
-
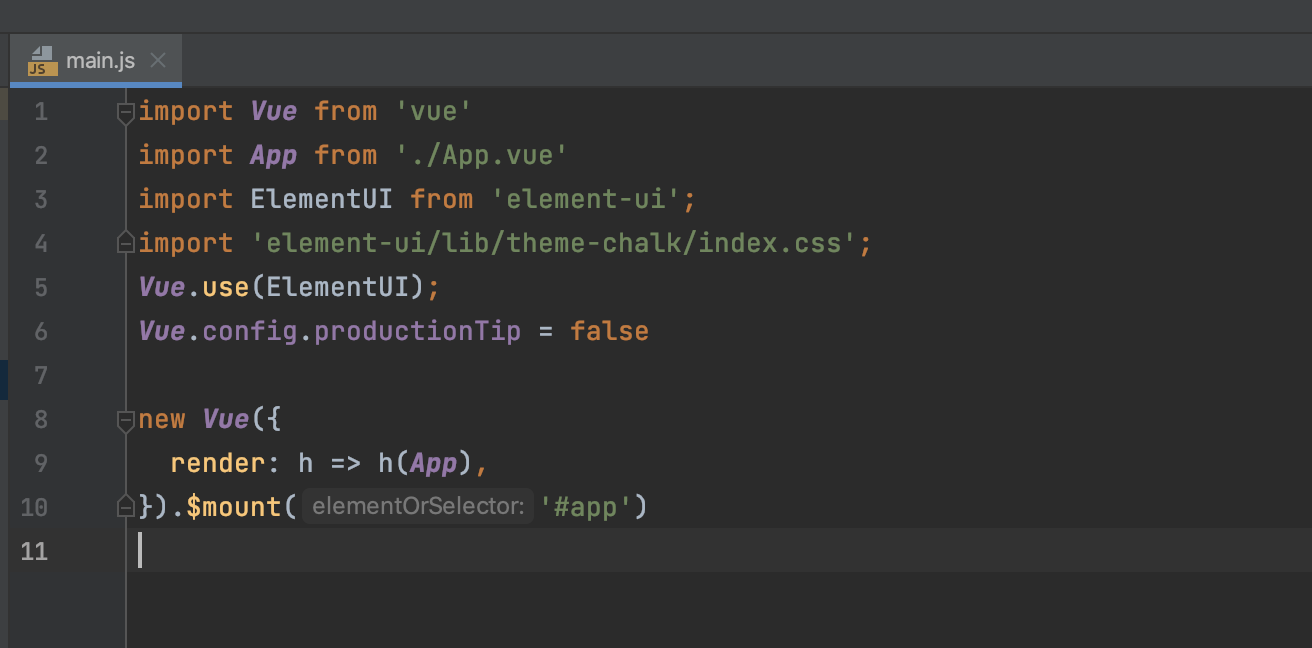
vue前端开发笔记3 - 安装elementUI 此次安装基于vue2安装element-UInpm i element-ui -S在mian.js中引入UIimport ElementUI from 'element-ui'; import 'element-ui/lib/theme-chalk/index.css'; Vue.use(ElementUI);如图:使用element-ui组件<template> <div class="hello"> <h1>{{ msg }}</h1> <el-row> <el-button>默认按钮</el-button> <el-button type="primary">主要按钮</el-button> <el-button type="success">成功按钮</el-button> <el-button type="info">信息按钮</el-button> <el-button type="warning">警告按钮</el-button> <el-button type="danger">危险按钮</el-button> </el-row> </div> </template>如图: