

搜索到
23
篇与
实用代码
的结果
-
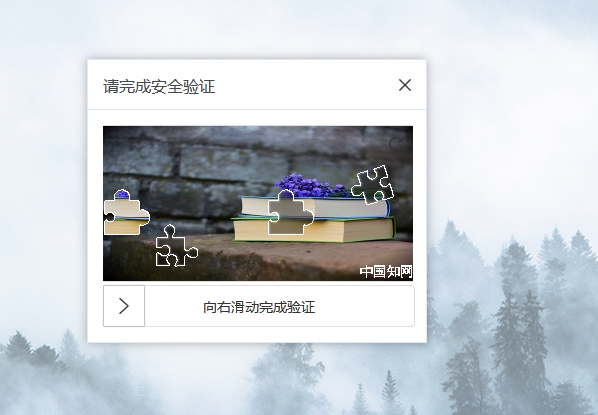
 知网滑块验证 解密 文献爬虫 数据抓取 最近需要抓取知网的文献资料,但是在打开文章时,会重定向到一个验证网址,并弹出一个滑块,让你进行验证。打开控制台,抓取两个接口获取滑块信息https://kns.cnki.net/verify-api/get这个接口会返回滑块图片信息(jigsawImageBase64、originalImageBase64),以及token、secretKeybase64 就是两张图片,一张是大图,一张是小图。token 需要提交给验证接口secretKey 参与坐标加密验证滑块信息https://kns.cnki.net/verify-api/web/check这个接口需要提交一些参数,最重要的是 pointJson这个是由坐标信息:{"x":0,"y":5} 和 secretKey 进行加密之后的结果{dotted startColor="#ff6c6c" endColor="#1989fa"/}{mtitle title="下面是一些重要的部分"/}识别小图在大图中的位置可以使用 opencv-python 包, 附带函数:''' 识别滑块位置 ''' def find_template_position(self,big_img_base64, small_img_base64): # 将 Base64 字符串解码为图像数据 def base64_to_image(base64_str): # 去掉可能的头部信息(如 "data:image/png;base64,") if "," in base64_str: base64_str = base64_str.split(",")[1] # 解码为字节数据 img_bytes = base64.b64decode(base64_str) # 转换为 numpy 数组 img_array = np.frombuffer(img_bytes, dtype=np.uint8) # 用 OpenCV 解码图像 img = cv2.imdecode(img_array, cv2.IMREAD_GRAYSCALE) return img # 解码 Base64 并转为灰度图 big_img = base64_to_image(big_img_base64) small_img = base64_to_image(small_img_base64) # Canny边缘检测 edges_big = cv2.Canny(big_img, 50, 150) edges_small = cv2.Canny(small_img, 50, 150) # 轮廓匹配 res = cv2.matchTemplate(edges_big, edges_small, cv2.TM_CCOEFF_NORMED) _, _, _, max_loc = cv2.minMaxLoc(res) return max_loc生成客户端ID在获取滑块信息时,要提交一个 clientUid 参数,但是好像使用固定的也没关系''' 生成客户端ID ''' def generate_clientUid(self): hex_digits = '0123456789abcdef' uuid_chars = [] # 生成 32 个随机十六进制字符(无分隔符) for _ in range(32): uuid_chars.append(random.choice(hex_digits)) # 固定版本号和变体标识位(符合 UUID v4 规范) uuid_chars[12] = '4' # UUID 版本位 uuid_chars[16] = hex_digits[(int(uuid_chars[16], 16) & 0x3 | 0x8)] # 变体位 return ''.join(uuid_chars)pointJson 加密方式point = {"x": x + 3, "y": 5} # x轴+3 y轴固定为5 # 转为json格式并进行加密 json_str = json.dumps(point, separators=(',', ':')) pointJson = self.encrypt_point_json(json_str, verify_data['secretKey']) print(f"识别滑块坐标:{point} 坐标加密:{pointJson}")pointJson 加密函数隐藏内容,请前往内页查看详情验证成功在滑块验证成功后,需要携带 captchaId访问文章,就可以免验证了。returnUrl = check_reslut_data.get("returnUrl") returnUrl = f"{returnUrl}&captchaId={check_reslut_data['captchaId']}"行为异常如果出现行为异常,也需要进行滑块验证,但是这个滑块是单机的,也就是说可以忽略。抓取页面的v-value ,访问下面这个地址,就会返回一个可以访问的文章地址。隐藏内容,请前往内页查看详情本文仅学习研究记录。
 -
Python-openAI 助手接口封装(含创建助手、文件上传、线程、消息、运行) 最近的项目中用到GPT,简单封装一下。包含创建助手、上传文件、创建线程、创建消息线程、运行线程、删除等操作。我是使用的异步,同步大差不大,去掉async、await就行了,调用方法都是一样的。官方API接口:https://platform.openai.com/docs/api-reference/assistants核心代码隐藏内容,请前往内页查看详情测试运行api_key = "sk----------" assistant_id = "asst_R3KqDZNg4QPzxd6U56INh0Cd" thread_id = "thread_vWZ9QrPBPTDHrtxIiSIof3hs" file_assistant_gpt = FileAssistant(api_key,assistant_id, thread_id) await file_assistant_gpt.run_file_analysis("data.txt","请帮我分析该文件...")
-
python 异步网络请求封装函数 带重试机制,支持get、post python基于httpx的异步网络请求,带重试机制,支持post、get,自定义header、携带cookie、等功能。函数import asyncio from typing import Optional import httpx ''' 带重试机制的网络请求函数 post、get ''' # get请求 重试机制 async def curl_get( client: httpx.AsyncClient, url: str, id:int = 0, cookie: Optional[dict] = None, headers: Optional[dict] = None, retries: int = 3): # 设置重试次数 for attempt in range(1,retries + 1): try: response = await client.get(url, cookies=cookie, headers=headers) response.raise_for_status() # 如果请求失败,抛出异常 return {"code": 1,"id":id, "response":response,"attempt":attempt} # 返回解析后的 JSON 数据 except httpx.HTTPStatusError as e: if attempt < retries: await asyncio.sleep(1) # 重试前暂停1秒 else: return {"code": 0,"id":id, "error": f"请求失败:{e.response.status_code}","attempt":attempt} except httpx.RequestError as e: print("网络错误",e) # 捕获网络错误(例如请求超时、连接错误等) if attempt < retries: await asyncio.sleep(2) # 重试前暂停1秒 else: return {"code": 0, "id":id,"error": f"网络错误 [已重试{str(attempt)}次]:{str(e)}","attempt":attempt} except Exception as e: if attempt < retries: await asyncio.sleep(1) # 重试前暂停1秒 else: return {"code": 0, "id": id, "error": f"请求错误 [已重试{str(attempt)}次]:{str(e)}", "attempt": attempt} return {"code": 0,"id":id, "error": "重试次数已达上限","attempt":attempt} # post请求 重试机制 async def curl_post( client: httpx.AsyncClient, url: str, data = None, cookie: Optional[dict] = None, headers: Optional[dict] = None, retries: int = 3): # 设置重试次数 for attempt in range(1,retries + 1): try: response = await client.post(url=url, cookies=cookie, headers=headers, data=data) response.raise_for_status() # 如果请求失败,抛出异常 html = response.text return {"code": 1, 'response':response, "data":html , "attempt": attempt } # 返回解析后的 JSON 数据 except httpx.HTTPStatusError as e: # 捕获 HTTP 错误(例如 404 或 500 错误) if attempt < retries: await asyncio.sleep(1) # 重试前暂停1秒 else: return {"code": 0, "error": f"请求失败:{e.response.status_code}", "attempt": attempt} except httpx.RequestError as e: # 捕获网络错误(例如请求超时、连接错误等) if attempt < retries: await asyncio.sleep(1) # 重试前暂停1秒 else: return {"code": 0,"error": f"请求错误 [{str(attempt)}] {str(e)}", "attempt": attempt} except Exception as e: if attempt < retries: await asyncio.sleep(1) # 重试前暂停1秒 else: return {"code": 0, "id": id, "error": f"请求错误 [{str(attempt)}]:{str(e)}", "attempt": attempt} return {"code": 0, "error": "重试次数已达上限","attempt":attempt}使用async with httpx.AsyncClient() as client: reslut = await curl_get(client, url) if reslut.get("code") != 1: return reslut.get("error") response = reslut.get("response") json = response.json()
-
docker中安装Python和R语言,并指定版本和R包 最近开发的一个项目,用到了R语言脚本。因为开发环境版本是4.4.2,所以生产环境也要装4.4.2。本来是这样写的,R语言版本指定不了。不管怎么写版本号 r-base=xxx 都安装不上,说不存在。# 安装R语言环境(默认是安装的4.2,但是我要装4.4) RUN apt-get update && apt-get install -y \ --fix-missing \ r-base \ r-cran-devtools \ build-essential \ libcurl4-openssl-dev \ libssl-dev \ libxml2-dev && \ rm -rf /var/lib/apt/lists/*搞不懂,换个思路,直接下载4.2.2版本安装# 使用 python 3.12 作为基础镜像 FROM python:3.12 # 设置工作目录 WORKDIR /app # 安装系统依赖和编译工具 RUN apt-get update && apt-get install -y --no-install-recommends \ build-essential \ wget \ libcurl4-openssl-dev \ libssl-dev \ libxml2-dev \ ca-certificates \ gfortran \ && rm -rf /var/lib/apt/lists/* # 下载并安装 R 4.4.2 源代码 RUN wget https://cran.r-project.org/src/base/R-4/R-4.4.2.tar.gz && \ tar -xvzf R-4.4.2.tar.gz && \ cd R-4.4.2 && \ ./configure && \ make && \ make install && \ cd .. && rm -rf R-4.4.2 R-4.4.2.tar.gz \ R --version # 设置 CRAN 镜像源为清华镜像并安装 R 包 RUN echo "options(repos = c(CRAN = 'https://mirrors.tuna.tsinghua.edu.cn/CRAN/'))" > /usr/local/lib/R/etc/Rprofile.site && \ Rscript -e "install.packages('pheatmap')" && \ Rscript -e "install.packages('BiocManager')" && \ echo "options(BioC_mirror = 'https://mirrors.tuna.tsinghua.edu.cn/bioconductor')" >> /usr/local/lib/R/etc/Rprofile.site && \ Rscript -e "BiocManager::install(version = '3.20')" && \ Rscript -e "BiocManager::install(c('GEOquery', 'ggplot2', 'readxl', 'readr', 'openxlsx', 'dplyr', 'clusterProfiler', 'limma', 'DESeq2'), ask = FALSE)" # 进入容器 # 查看R的安装目录:which R # 查看R版本:R --version 或 Rscript -e "R.version$version.string" # 查看R镜像:Rscript -e "print(getOption('repos'))" # 查看BiocManager版本: Rscript -e "packageVersion("BiocManager")" (BiocManager包的版本号。根据你当前的环境,它可能是通过 CRAN 安装的版本,通常在 1.x 系列) # 查看Bioconductor版本: Rscript -e "BiocManager::version()" (Bioconductor的版本。BiocManager 会根据你所安装的 Bioconductor 版本返回一个版本号。Bioconductor 的版本通常是以 3.x 开头的,例如 3.20。Bioconductor 版本是根据 R 版本来决定的,与 CRAN 上的 BiocManager 版本号是分开的。) # 查看BiocManager镜像: Rscript -e "options('BioC_mirror')" # 将当前目录的内容复制到容器中 COPY . /app # 安装 Python 项目所需的依赖 RUN pip install --no-cache-dir -r requirements.txt -i https://pypi.tuna.tsinghua.edu.cn/simple
-
-
微博CK免扫码快捷登录 分析 现在各大平台都支持第三方账号快捷登录;本次是分析如何使用微博CK登录各个平台账号。在登录之前,肯定是需要登录平台绑定微博账号的。有什么用?emmm,假如,你有一个迅雷会员,要借¥给别人用。但是你不想或者不能提供手机号码给别人登录,又不想提供账号登录密码....展示目前测试迅雷、百度都可以用{dotted startColor="#ff6c6c" endColor="#1989fa"/}分析隐藏内容,请前往内页查看详情思路打开,如果做成卡密形式的思路:生成一个卡密,绑定这个ck,可以给卡密设置过期时间。前端扫码完,将二维码地址和卡密一起传给后端。后端先校验卡密,通过后,再用卡密对应的ck进行登录~~~如果你有很多ck。。。。。本文章用于记录学习过程、交流。本文章用于记录学习过程、交流。本文章用于记录学习过程、交流。
-
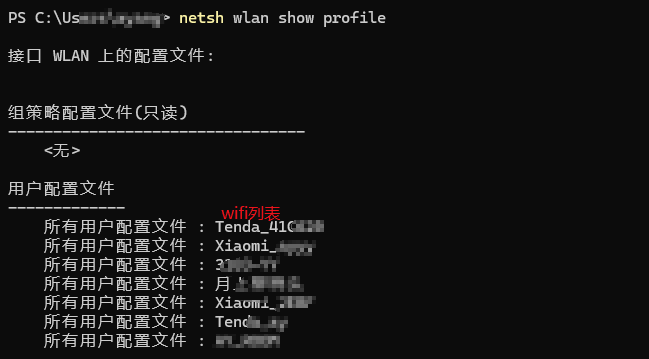
两句命令查看电脑上已连接的wifi以及密码 附python代码 打开终端,输入两条命令,即可查看当前电脑上所有已保存的wifi以及密码可以列出已保存的wifi网络名netsh wlan show profile打印出WiFi信息(包含密码)netsh wlan show profile name=Wifi网络名字 key=clear使用python代码获取 import subprocess cmd1 = "netsh wlan show profile" cmd2 = "netsh wlan show profile name={wifi} key=clear" def get_wifi(): # 执行 查看wifi列表 命令 reslut = subprocess.run(cmd1.split() , capture_output= True,text=True) if reslut.returncode == 0: output_lines = reslut.stdout.split("\n") # 获取到所有wifi的名称 wifi_profiles = [ line.split(":")[1].strip() for line in output_lines if "所有用户配置文件" in line] for wifi_profile in wifi_profiles: # 查询每个wifi的密码 cmd = cmd2.replace("{wifi}", wifi_profile) wifikey = subprocess.run(cmd.split() , capture_output= True,text=True) if wifikey.returncode == 0: pwds = [line.split(":")[1].strip() for line in wifikey.stdout.split("\n") if "关键内容" in line] for pwd in pwds: print(f'WIFI: {wifi_profile},密码{pwd}') else: print(f'WIFI: {wifi_profile} 获取失败') else: print("获取WIFI配置失败") if __name__ == '__main__': get_wifi()
-
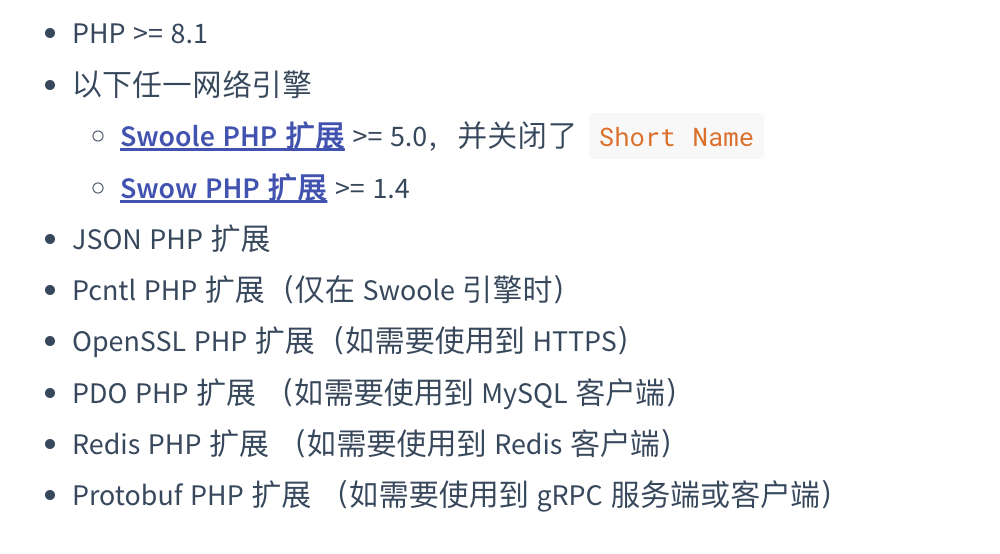
docker-dnmp环境中安装hyperf框架 安装PHP8.2以及相关扩展.env设置php根据框架要求将php版本设置为 8.2 ,以及安装所需的扩展 opcache,redis,swoole,pcntl PHP80_VERSION=8.2.12 PHP80_PHP_CONF_FILE=./services/php80/php.ini PHP80_FPM_CONF_FILE=./services/php80/php-fpm.conf PHP80_LOG_DIR=./logs/php80 PHP80_EXTENSIONS=pdo_mysql,mysqli,mbstring,gd,curl,opcache,redis,swoole,pcntldocker-compose.yml 端口映射与暴露我设置的是9800端口 php80: build: context: ./services/php80 args: PHP_VERSION: php:${PHP80_VERSION}-fpm-alpine CONTAINER_PACKAGE_URL: ${CONTAINER_PACKAGE_URL} COMPOSER_URL: ${COMPOSER_URL} PHP_EXTENSIONS: ${PHP80_EXTENSIONS} TZ: "$TZ" container_name: php80 expose: - 9501 - 9800 ports: - "9800:9800" volumes: - ${SOURCE_DIR}:/www/:rw - ${PHP80_PHP_CONF_FILE}:/usr/local/etc/php/php.ini:ro - ${PHP80_FPM_CONF_FILE}:/usr/local/etc/php-fpm.d/www.conf:rw - ${PHP80_LOG_DIR}:/var/log/php - ${DATA_DIR}/composer:/tmp/composer restart: always cap_add: - SYS_PTRACE networks: - default设置完成后运行进入到php8的控制台docker exec -it php80 /bin/sh进入www目录,安装框架composer create-project hyperf/hyperf-skeleton 将端口改成9800hyperf-skeleton/config/autoload/server.php 'mode' => SWOOLE_PROCESS, 'servers' => [ [ 'name' => 'http', 'type' => Server::SERVER_HTTP, 'host' => '0.0.0.0', 'port' => 9800, # 这里 'sock_type' => SWOOLE_SOCK_TCP, 'callbacks' => [ Event::ON_REQUEST => [Hyperf\HttpServer\Server::class, 'onRequest'], ], 'options' => [ // Whether to enable request lifecycle event 'enable_request_lifecycle' => false, ], ], ],运行php bin/hyperf.php start访问 0.0.0.0:9800
-
-