

搜索到
114
篇与
EN
的结果
-
 Python 多线程 模拟10个人吃饭需要多少时间{tabs}{tabs-pane label="单线程"}import time t1 = time.time() def eat(name): print("%s 吃饭" % str(name)) time.sleep(1) if __name__ == '__main__': # 模拟10个人吃饭 for i in range(10): # 单线程调用 eat(i) t2 = time.time() print('执行的时间:',t2-t1) #>>> 执行的时间: 10.00459885597229 ''' 等上一个人吃完饭,下一个才能吃 '''{/tabs-pane}{tabs-pane label="多线程"}import time t1 = time.time() def eat(name): print("%s 吃饭" % str(name)) time.sleep(1) if __name__ == '__main__': # 模拟10个人吃饭 for i in range(10): #多线程调用 t = threading.Thread(target=eat,args=(i,)) t.start() # 启动线程 t2 = time.time() print('执行的时间:',t2-t1) #>>> 执行的时间: 0.0031862258911132812 ''' 10个人可以同时吃饭 '''{/tabs-pane}{/tabs}多线程 线程守护与阻塞import time from threading import Thread def funa(): print("学习") time.sleep(1) print("看鲁迅的书呢") def funb(): print("休息") time.sleep(2) print("闭目养神呢") if __name__ == '__main__': f1 = Thread(target=funa) f2 = Thread(target=funb) # 守护线程 f1.daemon = True f2.daemon = True # 开启子线程 f1.start() f2.start() # 阻塞主线程 等待子线程执行完 f1.join() f2.join() print("这是主线程") ''' >>> 学习 休息 看鲁迅的书呢 闭目养神呢 这是主线程 如果没有 join() 阻塞主线程 >>> 学习 休息 这是主线程 '''线程封装 , start()和run()的区别''' 1. 继承Thread 2. 重构run方法 线程执行是 无序的,他是有cpu来决定的。 start() 启动线程。声明子线程的函数已经就绪,等待被cpu执行 run() 允许线程。执行到这个子线程时,自动调用的方法 ''' import threading from threading import Thread import time class Ourthrad(Thread): # 重构run方法 def run(self): print(f"当前线程 {threading.current_thread().name}") #time.sleep(2) #print("啦啦啦") if __name__ == '__main__': # 创建线程实例 t1 = Ourthrad() t2 = Ourthrad() t1.start() #>>> 当前线程 Thread-1 t2.start() #>>> 当前线程 Thread-2 t1.run() #>>> 当前线程 MainThread t2.run() #>>> 当前线程 MainThread
 -
Python 中间件 定义中间件在 根目录 下,创建 midd文件夹,在 midd文件夹 下创建 md.py 文件,写入 类为 MyMd 的中间件''' 自定义一个中间件 继承 MiddlewareMixin ''' from django.utils.deprecation import MiddlewareMixin class MyMd(MiddlewareMixin): def process_request(self, request): ''' 前置中间件 :param request: 请求数据 :return: 无发返回值或返回None,放行 不放行 返回 redirect、render、http... ''' # 【例如】如果是登录页面放行,不是登录页面判断cookie if request.path_info == '/login/': return else: pass print("前置中间件") pass def process_response(self, request, response): ''' 后置中间件 :param request: 请求数据 :param response: 响应返回数据 :return: ''' print("后置中间件") return response注册中间件在配置文件中的 settings.py 中 注册中间件# 中间件 按顺序执行 MIDDLEWARE = [ 'django.middleware.security.SecurityMiddleware', 'django.contrib.sessions.middleware.SessionMiddleware', 'django.middleware.common.CommonMiddleware', # csrf认证 'django.middleware.csrf.CsrfViewMiddleware', 'django.contrib.auth.middleware.AuthenticationMiddleware', 'django.contrib.messages.middleware.MessageMiddleware', 'django.middleware.clickjacking.XFrameOptionsMiddleware', # 自定中间件 'midd.md.MyMd' ] 执行结果先执行 前置中间件 ,再执行 业务代码 ,最后执行 后置中间件前置中间件 index 后置中间件
-
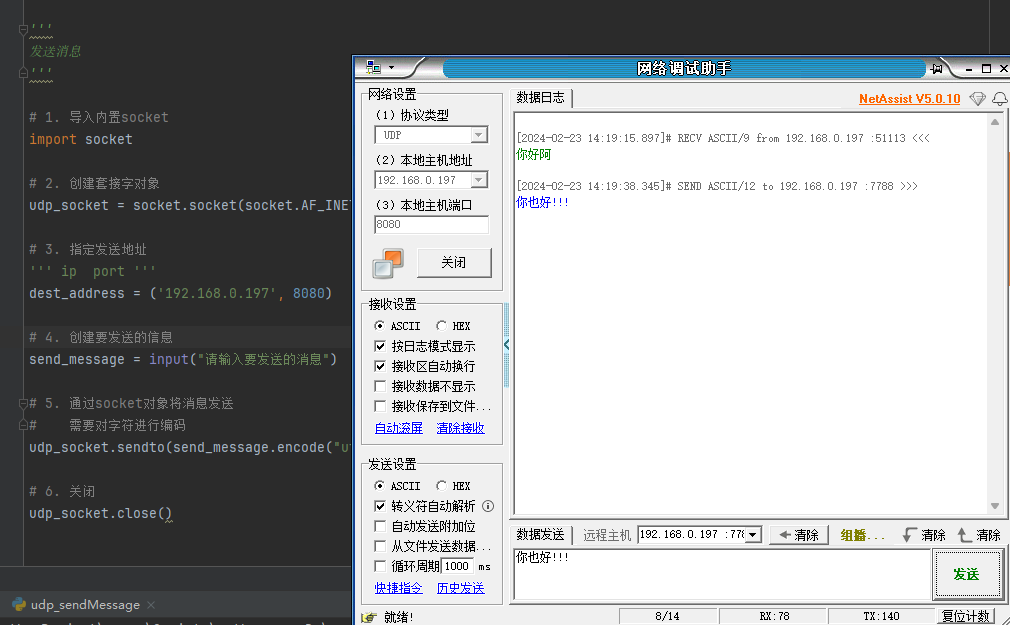
Python 网络通讯 使用socket接收和发送信息 发送消息 ''' 发送消息 ''' # 1. 导入内置socket import socket # 2. 创建套接字对象 udp_socket = socket.socket(socket.AF_INET, socket.SOCK_DGRAM) # 3. 指定发送地址 ''' ip port ''' dest_address = ('192.168.0.197', 8080) # 4. 创建要发送的信息 send_message = input("请输入要发送的消息") # 5. 通过socket对象将消息发送 # 需要对字符进行编码 udp_socket.sendto(send_message.encode("utf-8"),dest_address) # 6. 关闭 udp_socket.close()接收消息 ''' 接收消息 ''' # 1. 导入内置socket import socket # 2. 创建套接字对象 udp_socket = socket.socket(socket.AF_INET, socket.SOCK_DGRAM) # 3.绑定本机消息 ''' 如果IP地址为空,默认为本机的ip ''' localhost_address = ('',7788) udp_socket.bind(localhost_address) # 4. 等待接收消息 ''' 接收的消息是一个元组 第一个元素 是 消息内容 第二个元素 是 当前发送方的地址 ''' recv_msg = udp_socket.recvfrom(1024); # 1024 本次能够接收的最大消息字节数 # 5. 显示消息 print(recv_msg[0].decode("utf-8")) # 内容解码 print(recv_msg[1]) # 6. 关闭 udp_socket.close() print(",,,")DEMO import socket def send(udp_socket): msg = input("请输入要发送的消息") dest_address = ('192.168.0.197', 8080) udp_socket.sendto(msg.encode("utf-8"), dest_address) def recv(udp_socket): recv_msg = udp_socket.recvfrom(1024); # 1024 本次能够接收的最大消息字节数 msg = recv_msg[0].decode("utf-8") recv_IP = recv_msg[1] print(f'消息:{msg} 来自 {recv_IP}') def main(): # 创建 udp_socket = socket.socket(socket.AF_INET, socket.SOCK_DGRAM) # 绑定本机消息 udp_socket.bind( ('',7788) ) # 死循环 保证程序一直运行 while True: print('=' * 30) print("1.发送消息") print("2.接收消息") print("3.结束聊天") print("=" * 30) op_num = input("请输入操作序号") if op_num == '1': # 发送消息 send(udp_socket) pass elif op_num == '2': # 接收消息 recv(udp_socket) pass elif op_num == '3': # 结束聊天 break else: print("输入有误") udp_socket.close() print("关闭聊天") if __name__ == '__main__': main()
-
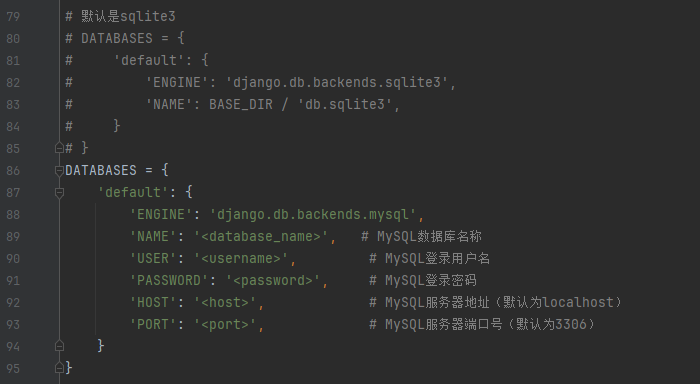
Python ORM数据库操作 创建数据库::(灯泡) 使用工具或者命令 自己创建一个数据库项目连接数据库首先确保已经安装了支持MySQL的Python驱动。可以使用pip命令来安装:pip install mysqlclientpip install pymysql打开项目的settings.py文件,并添加如下配置信息到DATABASES字典中:DATABASES = { 'default': { 'ENGINE': 'django.db.backends.mysql', 'NAME': '<database_name>', # MySQL数据库名称 'USER': '<username>', # MySQL登录用户名 'PASSWORD': '<password>', # MySQL登录密码 'HOST': '<host>', # MySQL服务器地址(默认为localhost) 'PORT': '<port>', # MySQL服务器端口号(默认为3306) } }创建表::(灯泡) 去app下的models.py中创建指定的类 + 命令,自动创建表from django.db import models # Create your models here. class UserInfo(models.Model): # id = models.AutoField(primary_key=True) #会自动创建 name = models.CharField(max_length=30, verbose_name='姓名') #varchar password = models.CharField(max_length=30, verbose_name='密码') #varchar age = models.IntegerField(verbose_name='年龄') # int email = models.EmailField(verbose_name='邮箱',max_length=45) #varchar ::(灯泡) 命令''' 必须先在settings.py中注册app,否则无法创建 ''' ''' 读取所有已注册的App中的models.py文件,根据类生成配置文件并放到app下的migrations目录 ''' python manage.py makemigrations ''' 根据配置文件自动生成相应的SQL语句 ''' python manage.py migrate 修改、新增 表修改 models.py 后 重新执行命令class UserInfo(models.Model): # id = models.AutoField(primary_key=True) #会自动创建 name = models.CharField(max_length=30, verbose_name='姓名') #将 password字段 改成 pwd pwd = models.CharField(max_length=30, verbose_name='密码') age = models.IntegerField(verbose_name='年龄') # int email = models.EmailField(verbose_name='邮箱',max_length=45) # 添加一列 qq = models.CharField(max_length=11, verbose_name='QQ',null=True,blank=True) # 添加一列 null=True,blank=True 表示可以为空,否则会报错 wx = models.CharField(max_length=20, verbose_name='微信',default="") # 添加一列default="" 设置默认值 # 新增一个表 class Departmert(models.Model): title = models.CharField(max_length=32, verbose_name='标题') 数据操作 增删改查::(灯泡) 新增# 第一种方式 models.UserInfo.objects.create(name="张三", password="12344556", age=18, email="123@qq.com") # 第二种方式 models.UserInfo.objects.create(**{"name":"李四", "password":"123456", "age":18, "email":"456@qq.com"})::(灯泡) 查询#查询所有 【返回 列表】 res = models.UserInfo.objects.all() # 查询 张三且18岁 【返回 列表】 res = models.UserInfo.objects.filter(name="张三",age=18) # 查询 张三且18岁 【返回 一行对象】 取一条数据 res = models.UserInfo.objects.filter(name="张三",age=18).frist() ''' 未查询数据时返回 None ''' #查询 排序 res = models.UserInfo.objects.all().order_by("id") # asc res = models.UserInfo.objects.all().order_by("-id") # desc::(灯泡) 修改''' 修改 在查询条件后面加上 update() ''' # 把所有年龄改成 19 models.UserInfo.objects.all().update(age=19) # 把id=20的用户年龄改成 19 models.UserInfo.objects.filter(id=10).update(age=20)::(灯泡) 删除''' 删除 在查询条件后面加上 delete() ''' # 删除所有用户 models.UserInfo.objects.all().delete() # 删除张三18岁的用户 models.UserInfo.objects.filter(name="张三",age=18).delete(){lamp/}使用在 web/ views.py 中写入数据库操作代码, 并在 urls.py 中配置好路由,访问不同的路由实现对应的功能from web import views urlpatterns = [ path('admin/', admin.site.urls), path('login/', views.login), path('index/', views.index), path('adduser/', views.addUser), path('updateuser/', views.updateUser), path('deleteuser/', views.deleteUser), ] from django.shortcuts import render,redirect from django.shortcuts import HttpResponse from web import models # 导入models import random # 新增用户 def addUser(request): username = "sss %s" % str(random.random()); models.UserInfo.objects.create(name = f"张{username}", password="123456", age=18, email="123@qq.com") return HttpResponse("添加成功") # 修改用户 def updateUser(request): models.UserInfo.objects.filter(id=1).update(age=15) return HttpResponse("修改成功") # 删除用户 def deleteUser(request): models.UserInfo.objects.filter(age=18).delete() return HttpResponse("删除成功")创建带外键的表from django.db import models class Dept(models.Model): title = models.CharField(verbose_name='名称',max_length=32) class User(models.Model): name = models.CharField(verbose_name='姓名',max_length=12) age = models.IntegerField(verbose_name='年龄') salary = models.FloatField(verbose_name='工资') # dept_id = models.IntegerField(verbose_name='部门ID') # 只是创建了一个字段,没有关联 # 关联外键 ''' dept 创建的时候会创建 dept_id to_field="id" 可以不写,默认是id on_delete=models.CASCADE 级联删除 on_delete=models.SET_NULL 设置为空,但是必须允许字段为空 null=True,blank=True on_delete=models.SET_DEFAULT 设置为默认值 加上 default=1 ''' # dept = models.ForeignKey(verbose_name='关联部门',to='Dept',to_field="id",on_delete=models.CASCADE) # dept = models.ForeignKey(verbose_name='关联部门',to='Dept',on_delete=models.SET_NULL,null=True,blank=True) dept = models.ForeignKey(verbose_name='关联部门', to='Dept', on_delete=models.SET_DEFAULT, default=1) ''' 有外键表的数据操作 ''' ''' 新增 ''' # 创建数据时,使用 dept_id = 部门id models.User.objects.create(name = '张三',age = 22,salary = 3000, dept_id = 1) # 创建数据时,也可以使用 dept = 部门对象 deptObj = models.Dept.objects.filter(id=1).first() models.User.objects.create(name = '张三',age = 22,salary = 3000, dept = deptObj) ''' 查询 ''' # 使用部门ID models.User.objects.filter(dept_id = 1) # 通过部门名称搜索用户 dept__name 双下划线。 models.User.objects.filter(dept__name = '开发部') # 获取用户的部门名称 UserObj = models.User.objects.filter(id=1).first() UserObj.dept.name 报错{message type="error" content=" Django提示mysql版本过低:django.db.utils.NotSupportedError: MySQL 8 or later is required (found 5.7.26)."/}{x} 因为mysql5.7及以下是免费的数据库,8.0之后是收费的。使用免费的数据库更放心,使用上没有什么区别。这个提示只是Django的版本检测提示,把它注释掉就好了。 项目\venv\Lib\site-packages\django\db\backends\base\base.py 中 找到 check_database_version_supported() 函数 ,注释掉。
-
Python 文件操作 读取文件''' 1. 打开文件,并 返回文件的操作对象 f = open(r"文件名","访问方式(r/w/a)", encoding='utf-8') r 只读 默认,文件的指针将放在文件的开头 w 写入 如果文件已存在将其覆盖、不存在则创建并写入 a 追加 如果已经存在,会追加在后面,不存在则创建并写入 r+ 读写 w+ 读写,不存在则创建 a+ 读写、追加。存在即追加在后面,不存在则创建 .... f对象的属性 f.closed 返回 True/False 文件是否被关闭 f.mode 返回文件打开的访问方式 f.name 返回文件的名称 ''' #f = open(r"D:\python\文件操作\1.txt") # 绝对路径 f = open(r"1.txt","r", encoding='utf-8') ''' 2.读取文件内容 ''' # text = f.read(10) # 读取前10个字节 text = f.read() # 读取全部内容 print(text) ''' 3.关闭文件 ''' f.close() 写文件 f2 = open(r"2.txt","w", encoding='utf-8') f2.write("写入文件3") f2.close()文件异常情况下 关闭文件''' 无论IO操作是否报错,都要关闭文件 ''' try: f = open(r"1.txt", "r", encoding='utf-8') text = f.read() # 读取全部内容 print(text) finally: f.close() 使用 with 操作文件# with 作用通 try finally # with 上下文管理器 # 使用with 使用完文件后,会自动关闭 with open(r"1.txt", "r", encoding='utf-8') as f: print(f.read()) print(f.closed) #>>> True print("------------------------") # tell() 方法告诉你文件的当前位置,下一次从当前位置开始 # seek(offset,[.from]) 改变当前文件的位置 offset开始的偏移量,from指定开始移动字节的参考位置 f = open(r"2.txt", "r", encoding='utf-8') text = f.read(10) # 读取全部内容 print("当前文本:",text) # 查找当前位置 pos = f.tell() print("当前文件的位置:",pos) pos = f.seek(0,0) text2 = f.read(10) # 读取全部内容 print("当前文本:",text2) f.close() 使用readline、readlines读取文件''' f.readline() 按行读取 >>> 哈哈哈哈哈哈1 哈哈哈哈哈哈2 哈哈哈哈哈哈3 哈哈哈哈哈哈4 哈哈哈哈哈哈5 哈哈哈哈哈哈6 哈哈哈哈哈哈7 哈哈 ''' with open("3.txt","r",encoding="utf") as f: while True: # 读取一行 text = f.readline() if not text: break print(text,end="") ''' f.readlines() 返回一个列表。一次性读取完,每一行是一个元素 >>> ['哈哈哈哈哈哈1\n', '哈哈哈哈哈哈2\n', '哈哈哈哈哈哈3\n', '哈哈哈哈哈哈4\n', '哈哈哈哈哈哈5\n', '哈哈哈哈哈哈6\n', '哈哈哈哈哈哈7\n', '哈哈'] ''' with open("3.txt","r",encoding="utf") as f: text = f.readlines() print(text)
-
Python 魔术方法 魔术方法class A: mind = "哈哈" def __init__(self): print("A init") self.title = "这是A类" ''' 描述信息 ''' def funa(self): pass def __call__(self, *args, **kwargs): print("A call") ''' 查看所有的魔术方法 返回一个列表 ''' print(dir(A)) ''' 1. __doc__ 查看到注释内容 ''' print(A.__doc__) #>>> 描述信息 ''' 2. __module__ 当前操作的对象在哪个模块 ''' a = A() print(a.__module__) #>>> __main__ print(A.__module__) #>>> __main__ ''' 3. __class__ 当前操作的对象的类是哪个 ''' print(a.__class__) #>>> <class '__main__.A'> ''' 4. __call__ 允许类能像实例一样取调用实例方法 ''' A()() # >>> A init A call #创建实例对象 b = A() #>>> A init b() #>>> A call # 自动调用call方法 ''' 5. __dict__ 查看类或对象中的所有属性,返回一个字典 是 dir() 的子集 ''' # 查看类的属性 方法 print(A.__dict__) #>>> {'__module__': '__main__', 'mind': '哈哈', '__init__': <function A.__init__ at 0x000001C79FF28AE0>, 'funa': <function A.funa at 0x000001C79FF2A020>, '__call__': <function A.__call__ at 0x000001C7A01289A0>, '__dict__': <attribute '__dict__' of 'A' objects>, '__weakref__': <attribute '__weakref__' of 'A' objects>, '__doc__': None} # 查看实例对象的属性 print(a.__dict__) #>>> {'title': '这是A类'} ''' 6. __repr__ 输出是给程序员Debug看的 __str__ 打印实例对象时,返回自定义的字符串 ''' ''' 7. __getitem__(self,key) __setitem__(self,key,value) __getitem__(self,key) ''' class B: def __getitem__(self, key): print("__getitem__",key) def __setitem__(self, key, value): print("__setitem__", key,value) def __delitem__(self, key): print("__delitem__", key) bB = B() bB['name'] = "张三" # 自动触发执行__setitem__ >>> __setitem__ name 张三 res = bB['name'] # 自动触发执行__getitem__ >>> __getitem__ name del bB['name'] # 自动触发执行__delitem__ >>> __delitem__ name
-
Python 异常处理 异常捕获完整代码try: pass except A: # 针对错误类型A 代码处理 pass except B: # 针对错误类型B 代码处理 pass except C: # 针对错误类型C 代码处理 pass else: #没有异常才会执行的代码。只有在没有异常时才会执行的代码 pass finally: # 无论是否有异常 都会执行这里的代码 pass异常捕获try: num = int(input("输入数字:")) print(num) except: # 如果输入英文控制台 会执行这里。控制台不会报错 print("输入错误")异常错误类型捕获针对不能的异常错误,做不同的处理(执行不同的代码)try: num = int(input("输入数字:")) # 如果输入英文 会报ValueError reslut = 8 / num # 如果输入0 会报ZeroDivisionError print(reslut) except ValueError: print("请输入整数") except ZeroDivisionError: print("不能为0")异常传递def demo1(): return int(input("请输入整数")) def demo2(): return demo1() # 在主程序中添加异常处理 if __name__ == "__main__": try: demo2() except Exception as e: print(f'报错了!{e}') #输出信息 ''' 请输入整数a 报错了!invalid literal for int() with base 10: 'a' '''主动抛出异常def input_pass(): pwd = input("请输入密码") # 判断密码长度,小于6位数抛出异常 if len(pwd) < 6: print("主动抛出异常") # 主动抛出异常 ex = Exception("密码长度不够") raise ex return pwd if __name__ == '__main__': try: pwd = input_pass() print(f"{pwd} 密码输入正确") except Exception as e: print(e)
-
Python 母版继承 在模板文件中,公用的代码可以共用<!DOCTYPE html> <html lang="en"> <head> <meta charset="UTF-8"> <title>Title</title> {% block css %} {% endblock %} </head> <body> <h2>Layout</h2> <div> {% block content %} {% endblock %} </div> {% block js %} {% endblock %} </body> </html>{% extends 'layout.html' %} {% block content %} <h1> Index </h1> {% endblock %}> {% block js %} <script> console.log("...") </script> {% endblock %}>
-
Python 5中实现单例模式的方法 与 初始化方法只执行一次 在python中使用单例模式的代码使用__new__ 创建单例模式class A(): # 类属性 用来记录当前创建的类对象的引用地址 instance = None def __new__(cls, *args, **kwargs): # 判断类属性是否为None,如果是第一次执行则为None if cls.instance is None : # 调用父类方法 创建一个内存空间 cls.instance = super().__new__(cls) # 如果不是None ,返回当前的实例 return cls.instance def __init__(self): print("初始化...") # 调用。单例模式两个对象的地址是一样的 a = A() print(a) b = A() print(b) # 输出内容 ''' 初始化... <__main__.A object at 0x0000026C430207D0> 初始化... <__main__.A object at 0x0000026C430207D0> '''初始化方法只执行一次class B(): # 类属性 用来记录当前创建的类对象的引用地址 instance = None # 用于记录init函数执行次数的属性 init_flag = False def __new__(cls, *args, **kwargs): # 判断类属性是否为None,如果是第一次执行则为None if cls.instance is None : # 调用父类方法 创建一个内存空间 cls.instance = super().__new__(cls) # 如果不是None ,返回当前的实例 return cls.instance def __init__(self): ''' 如果是单例模式,init也只执行一次 ''' # 判断是否是第一次执行 if B.init_flag : return # 执行初始化 print("初始化...") B.init_flag = True #调用。 a = B() print(a) b = B() print(b) # 输出内容 ''' 初始化... <__main__.B object at 0x0000026C43021410> <__main__.B object at 0x0000026C43021410> '''通过类方法创建单例模式''' 通过类方法创建单例模式 ''' class A(object): instance = None @classmethod def get_instance(cls): if A.instance is None: A.instance = object.__new__(cls) return A.instance # 两个对象的地址是一致的 a = A.get_instance() b = A.get_instance() print(a) # >>> <__main__.A object at 0x000001CFE708E490> print(b) # >>> <__main__.A object at 0x000001CFE708E490>使用装饰器创建单例模式''' 使用装饰器创建单例模式 ''' def outer(fn): _ins = {} def inner(): if fn not in _ins: _ins[fn] = fn() return _ins[fn] return inner @outer class A(object): a = 1 a = A() b = A() print(a) # >>> <__main__.A object at 0x0000024D7109E790> print(b) # >>> <__main__.A object at 0x0000024D7109E790>模块导入单例模式''' Test文件中定义A类 ''' class A(object): pass a = A() print(a) ''' Test2中导入Test文件 ''' from Test import A from Test import A # >>> 导入两次 只输出一次a的内存地址使用 hasattr() 实现单例模式''' hasattr() 用于判断对象是否包含对应的属性 ''' class A(object): b = 2 def test(self): print("test") print(hasattr(A(),'b')) # >>> True print(hasattr(A(),'test')) # >>> True print(hasattr(A(),'a')) # >>> False ''' 使用 hasattr() 实现单例模式 ''' class B: def __init__(self,name): self.name = name def __new__(cls, *args, **kwargs): if not hasattr(cls, 'instance'): # instance 不存在时 执行 cls.instance = super().__new__(cls) # 调用父类创建实例 return cls.instance a = B("张三") b = B("李四") print(a,a.name) # >>> <__main__.B object at 0x00000213D983FB10> 李四 print(b,b.name) # >>> <__main__.B object at 0x00000213D983FB10> 李四 {dotted startColor="#ff6c6c" endColor="#1989fa"/}
-
Python 函数定义 模块与包的使用 在python中,每个py可以看作是一个模块,可以使用import导入使用其中的变量或函数函数定义在 demo2.py 中定义函数 # 函数 # def funName(): 定义函数 def echoString(str): ''' 这是函数的注释 :param str: :return: ''' print(str) #echoString("hello world") def nums(num1,num2): ''' 数字相加 :param num1: :param num2: :return: ''' num3 = num1 + num2 print(" %d + %d = %d" % (num1,num2,num3)) #nums(2,3) # 带返回值的函数 def nums2(num1,num2): return num1+num2 num3 = nums2(5,6) # >>> 11 #print(num3) 在 demo3.py 中引入 demo2.py 并使用import demo2 demo2.echoString("在demo3中调用demo2的方法") print(demo2.num3) {dotted startColor="#ff6c6c" endColor="#1989fa"/}模块与包使用PyCharm右键,新建python软件包会自动创建 __init__.py 文件在包下创建两个文件 receive.py 与 send.py 分别入两个函数def msg(str): print("接收信息:%s" % str)def msg(str): print("发送信息:%s" % str)在__init__.py 文件中写入代码from . import send from . import receive创建 test.py 导入包并使用import test_ test_.send.msg("你好") test_.receive.msg("hello")