

搜索到
24
篇与
Python
的结果
-

-
Python-openAI 助手接口封装(含创建助手、文件上传、线程、消息、运行) 最近的项目中用到GPT,简单封装一下。包含创建助手、上传文件、创建线程、创建消息线程、运行线程、删除等操作。我是使用的异步,同步大差不大,去掉async、await就行了,调用方法都是一样的。官方API接口:https://platform.openai.com/docs/api-reference/assistants核心代码隐藏内容,请前往内页查看详情测试运行api_key = "sk----------" assistant_id = "asst_R3KqDZNg4QPzxd6U56INh0Cd" thread_id = "thread_vWZ9QrPBPTDHrtxIiSIof3hs" file_assistant_gpt = FileAssistant(api_key,assistant_id, thread_id) await file_assistant_gpt.run_file_analysis("data.txt","请帮我分析该文件...")
-
python 异步网络请求封装函数 带重试机制,支持get、post python基于httpx的异步网络请求,带重试机制,支持post、get,自定义header、携带cookie、等功能。函数import asyncio from typing import Optional import httpx ''' 带重试机制的网络请求函数 post、get ''' # get请求 重试机制 async def curl_get( client: httpx.AsyncClient, url: str, id:int = 0, cookie: Optional[dict] = None, headers: Optional[dict] = None, retries: int = 3): # 设置重试次数 for attempt in range(1,retries + 1): try: response = await client.get(url, cookies=cookie, headers=headers) response.raise_for_status() # 如果请求失败,抛出异常 return {"code": 1,"id":id, "response":response,"attempt":attempt} # 返回解析后的 JSON 数据 except httpx.HTTPStatusError as e: if attempt < retries: await asyncio.sleep(1) # 重试前暂停1秒 else: return {"code": 0,"id":id, "error": f"请求失败:{e.response.status_code}","attempt":attempt} except httpx.RequestError as e: print("网络错误",e) # 捕获网络错误(例如请求超时、连接错误等) if attempt < retries: await asyncio.sleep(2) # 重试前暂停1秒 else: return {"code": 0, "id":id,"error": f"网络错误 [已重试{str(attempt)}次]:{str(e)}","attempt":attempt} except Exception as e: if attempt < retries: await asyncio.sleep(1) # 重试前暂停1秒 else: return {"code": 0, "id": id, "error": f"请求错误 [已重试{str(attempt)}次]:{str(e)}", "attempt": attempt} return {"code": 0,"id":id, "error": "重试次数已达上限","attempt":attempt} # post请求 重试机制 async def curl_post( client: httpx.AsyncClient, url: str, data = None, cookie: Optional[dict] = None, headers: Optional[dict] = None, retries: int = 3): # 设置重试次数 for attempt in range(1,retries + 1): try: response = await client.post(url=url, cookies=cookie, headers=headers, data=data) response.raise_for_status() # 如果请求失败,抛出异常 html = response.text return {"code": 1, 'response':response, "data":html , "attempt": attempt } # 返回解析后的 JSON 数据 except httpx.HTTPStatusError as e: # 捕获 HTTP 错误(例如 404 或 500 错误) if attempt < retries: await asyncio.sleep(1) # 重试前暂停1秒 else: return {"code": 0, "error": f"请求失败:{e.response.status_code}", "attempt": attempt} except httpx.RequestError as e: # 捕获网络错误(例如请求超时、连接错误等) if attempt < retries: await asyncio.sleep(1) # 重试前暂停1秒 else: return {"code": 0,"error": f"请求错误 [{str(attempt)}] {str(e)}", "attempt": attempt} except Exception as e: if attempt < retries: await asyncio.sleep(1) # 重试前暂停1秒 else: return {"code": 0, "id": id, "error": f"请求错误 [{str(attempt)}]:{str(e)}", "attempt": attempt} return {"code": 0, "error": "重试次数已达上限","attempt":attempt}使用async with httpx.AsyncClient() as client: reslut = await curl_get(client, url) if reslut.get("code") != 1: return reslut.get("error") response = reslut.get("response") json = response.json()
-
docker-R语言多版本安装,在python中使用R容器执行脚本 .env# 新增R版本 4.2.1 R_NAME_421=r_4_2_1 # 容器/镜像 名称 R_VERSION_421=4.2.1 # 版本号 R_PORT_421=8780 # 新增R版本 4.3.0 R_NAME_430=r_4_3_0 R_VERSION_430=4.3.0 R_PORT_430=8781 # 新增R版本 4.4.2 R_NAME_442=r_4_4_2 R_VERSION_442=4.4.2 R_PORT_442=8782docker-compose.yml # R 服务 4.2.1 r_4_2_1: build: context: . dockerfile: ${R_DOCKERFILE} # dockerfile公共文件 args: FROM_IMAGE: rocker/r-ver:${R_VERSION_421} # 指定镜像版本 R_BIOC_MIRROR: ${R_BIOC_MIRROR} # 公共 镜像源 R_CRAN: ${R_CRAN} container_name: ${R_NAME_421} # 指定版本名称 image: ${R_NAME_421}-image # 指定镜像名称 ports: - "${R_PORT_421}:${R_PORT_421}" # 指定端口 volumes: - ./R:/workspace/R - ./static/matrix:/workspace/static/matrix - .env:/workspace/.env # 挂载 .env 文件 #- ./store/docker/r-library/${R_NAME_442}:/usr/local/lib/R/site-library # 持久化 R 包的安装位置 environment: - R_HOME=/usr/local/lib/R command: Rscript R/http/start.R # 启动API服务 restart: unless-stopped networks: - backend # R 服务 4.3.0 r_4_3_0: build: context: . dockerfile: ${R_DOCKERFILE} # dockerfile公共文件 args: FROM_IMAGE: rocker/r-ver:${R_VERSION_430} # 指定镜像版本 R_BIOC_MIRROR: ${R_BIOC_MIRROR} # 公共 镜像源 R_CRAN: ${R_CRAN} container_name: ${R_NAME_430} # 指定版本名称 image: ${R_NAME_430}-image # 指定镜像名称 ports: - "${R_PORT_430}:${R_PORT_430}" # 指定端口 volumes: - ./R:/workspace/R - ./static/matrix:/workspace/static/matrix - .env:/workspace/.env # 挂载 .env 文件 #- ./store/docker/r-library/${R_NAME_430}:/usr/local/lib/R/site-library # 持久化 R 包的安装位置 environment: - R_HOME=/usr/local/lib/R command: Rscript R/http/start.R # 启动API服务 restart: unless-stopped networks: - backend # R 服务 4.4.2 r_4_4_2: build: context: . dockerfile: ${R_DOCKERFILE} # dockerfile公共文件 args: FROM_IMAGE: rocker/r-ver:${R_VERSION_442} # 指定镜像版本 R_BIOC_MIRROR: ${R_BIOC_MIRROR} # 公共 镜像源 R_CRAN: ${R_CRAN} container_name: ${R_NAME_442} # 指定版本名称 image: ${R_NAME_442}-image # 指定镜像名称 ports: - "${R_PORT_442}:${R_PORT_442}" # 指定端口 volumes: - ./R:/workspace/R - ./static/matrix:/workspace/static/matrix - .env:/workspace/.env # 挂载 .env 文件 #- ./store/docker/r-library/${R_VERSION_442}:/usr/local/lib/R/site-library # 持久化 R 包的安装位置 environment: - R_HOME=/usr/local/lib/R command: Rscript R/http/start.R # 启动API服务 restart: unless-stopped networks: - backend dockerfileARG FROM_IMAGE=rocker/r-ver:4.4.1 FROM ${FROM_IMAGE} ARG R_BIOC_MIRROR=https://mirrors.tuna.tsinghua.edu.cn/bioconductor ARG R_CRAN=https://mirrors.tuna.tsinghua.edu.cn/CRAN/ # 设置镜像源为清华大学的 CRAN 镜像和 Bioconductor 镜像 RUN echo "options(BioC_mirror = '${R_BIOC_MIRROR}')" >> /usr/local/lib/R/etc/Rprofile.site RUN echo "options(repos = c(CRAN = '${R_CRAN}'))" >> /usr/local/lib/R/etc/Rprofile.site ## 安装系统依赖包 RUN sed -i 's|http://archive.ubuntu.com/ubuntu/|https://mirrors.tuna.tsinghua.edu.cn/ubuntu/|' /etc/apt/sources.list && \ apt-get update && \ apt-get install -y \ libcurl4-openssl-dev \ libssl-dev \ libxml2-dev \ libfontconfig1-dev \ libharfbuzz-dev \ libfribidi-dev \ libpango1.0-dev \ libx11-dev \ libxt-dev \ libjpeg-dev \ libpng-dev \ libtiff-dev \ libbz2-dev \ libsodium-dev \ && rm -rf /var/lib/apt/lists/* \ # 安装中文字体 RUN apt-get update && apt-get install -y fonts-wqy-zenhei fonts-wqy-microhei ttf-mscorefonts-installer fontconfig # 查看系统中的中文字体:fc-list :lang=zh # 报错:dpkg 进程被中断了; 修复:dpkg --configure -a ## 设定工作目录 WORKDIR /workspace ## 常用包安装脚本 COPY R/docker/install_packages.R /workspace/install_packages.R # 验证文件是否被成功复制 RUN ls -l /workspace/install_packages.R ## 执行(耗时) RUN Rscript /workspace/install_packages.R ## 设定工作目录 WORKDIR /workspace # ## 保持容器在后台运行 CMD ["tail", "-f", "/dev/null"] install_packages.R # 安装常用的包 install.packages('pheatmap') install.packages('BiocManager') options(timeout = 600) install_missing_packages <- function(packages) { if (!requireNamespace("BiocManager", quietly = TRUE)) { install.packages("BiocManager") } for (package in packages) { if (!requireNamespace(package, quietly = TRUE)) { cat(paste("开始安装", package, "...\n")) BiocManager::install(package, ask = FALSE) } else { cat(paste( packageVersion(package), package, "已安装.\n" )) } } } # 安装常用的包 packages <- c('GEOquery', 'ggplot2', 'readxl', 'readr', 'openxlsx', 'dplyr', 'clusterProfiler', 'limma', 'DESeq2', 'ggtree', 'org.Hs.eg.db','org.Mm.eg.db','org.Rn.eg.db','GOplot','stringr', 'enrichplot', 'treeio', 'WGCNA', 'igraph','plumber','jsonlite','dotenv','remotes') # 安装缺失的 R 包 install_missing_packages(packages) # 针对某个版本中的某些包进行检测安装 r_version <- getRversion() cat(paste("检测R版本", r_version , "...\n")) if(r_version == "4.2.1"){ if (!requireNamespace("ggtree", quietly = TRUE)) { remotes::install_github("YuLab-SMU/ggtree") } if (!requireNamespace("clusterProfiler", quietly = TRUE)) { remotes::install_github("ctlab/fgsea") BiocManager::install("clusterProfiler") } } if(r_version == "4.3.0"){ if (!requireNamespace("ggtree", quietly = TRUE) && !requireNamespace("limma", quietly = TRUE) && !requireNamespace("org.Hs.eg.db", quietly = TRUE) ) { options(BioC_mirror = "https://bioconductor.org") install_missing_packages(packages) } if (!requireNamespace("ggtree", quietly = TRUE)) { remotes::install_github("YuLab-SMU/ggtree") } if (!requireNamespace("clusterProfiler", quietly = TRUE)) { remotes::install_github("ctlab/fgsea") BiocManager::install("clusterProfiler") } } 如何在Python中使用R容器,执行R脚本?搭建好后可以通过接口的方式运行R脚本也可以使用py-docker操作容器(线上可能需要挂载docker守护进程)接口服务http.R if (!requireNamespace("plumber", quietly = TRUE)) { cat(paste("开始安装", "plumber", "...\n")) BiocManager::install("plumber", ask = FALSE) } if (!requireNamespace("jsonlite", quietly = TRUE)) { cat(paste("开始安装", "jsonlite", "...\n")) BiocManager::install("jsonlite", ask = FALSE) } if (!requireNamespace("dotenv", quietly = TRUE)) { cat(paste("开始安装", "dotenv", "...\n")) BiocManager::install("dotenv", ask = FALSE) } cat("当前工作目录",getwd(),"\n") # 加载 dotenv 包 library(dotenv) library(plumber) # 读取 .env 文件 load_dot_env(".env") #print(Sys.getenv()) # 获取 R 版本号 r_version <- getRversion() cat("R版本:", as.character(r_version), "\n") # 将 R 版本号转换为 .env 文件中的键名格式 例如:4.2.1 -> 421 r_version_key <- gsub("\\.", "", as.character(r_version)) # 构建端口号的键名 port_key <- paste0("R_PORT_", r_version_key) # 从 .env 文件中获取端口号 port <- as.integer(Sys.getenv(port_key)) if (is.na(port)) { # 如果端口号不存在,使用默认端口 port <- 8006 # 默认端口 warning("未找到当前R版本的端口配置(",port_key,") 使用默认端口:", port) }else{ cat("找到当前 R 版本的端口配置:", port, "\n") } # 创建 plumber API pr <- plumb("R/http/app.R") # 启动 plumber 服务 pr$run(host = "0.0.0.0", port = port) app.Rlibrary(jsonlite) # 定义一个 API 端点,执行 R 脚本 #* 执行 R 脚本 #* @post /run_r_script function(req, script = "", param = "") { # 调用执行脚本的函数 result <- run_script(script, param) return(result) } #* 执行系统命令 post #* @post /run_command function(req, command = "") { if (command == "") { return(list(code = unbox(0),msg = unbox("未提供命令") )) } # 执行系统命令 result <- tryCatch({ output <- system(command, intern = TRUE) list(code = unbox(1), msg = unbox("命令执行成功"), data = output) }, error = function(e) { list(code = unbox(0), msg = unbox(e$message) ) }) return(result) } # 执行 R 脚本的函数 run_script <- function(script_path, params) { setwd("/workspace") # 检查脚本文件是否存在 if (!file.exists(script_path)) { return( list( code = unbox(0), msg = unbox("脚本文件不存在"), data = getwd() )) } # 将参数转换为 R 对象 #params <- jsonlite::fromJSON(params) # 构造命令行 command <- paste("Rscript", script_path, shQuote(params)) # 在独立环境中执行脚本 result <- tryCatch({ #run_result <- source(script_path) # 执行结果 run_result <- system(command, intern = TRUE) print(run_result) # 获取退出状态 exit_status <- attr(run_result, "status") exit_status <- ifelse(is.null(exit_status), 0, exit_status) print(cat("退出状态:",exit_status,"\n")) if(exit_status == 1){ # 将 run_result 转换为字符串 result_string <- paste(run_result, collapse = "\n") #print(result_string) list( code = unbox(0), # 使用 unbox() 将 code 转换为标量值 msg = unbox(result_string), data = run_result, # 捕获的输出 output = params ) }else{ #run_result <- capture.output(source(script_path)) list( code = unbox(1), # 使用 unbox() 将 code 转换为标量值 msg = unbox("脚本执行成功"), data = run_result, # 捕获的输出 output = params ) } }, error = function(e) { print(e) list( code = unbox(0), msg = unbox("脚本执行失败"), data = NULL, output = unbox(e$message) ) }) return(result) }
-
-
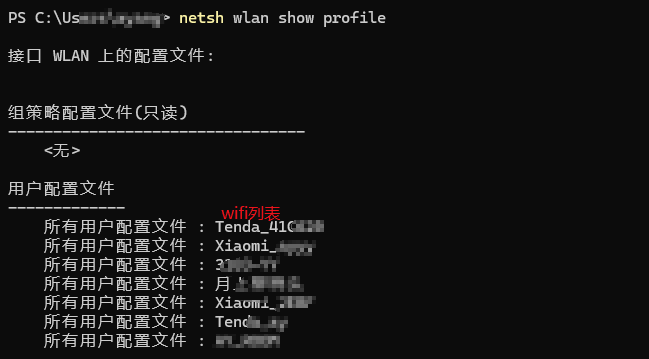
两句命令查看电脑上已连接的wifi以及密码 附python代码 打开终端,输入两条命令,即可查看当前电脑上所有已保存的wifi以及密码可以列出已保存的wifi网络名netsh wlan show profile打印出WiFi信息(包含密码)netsh wlan show profile name=Wifi网络名字 key=clear使用python代码获取 import subprocess cmd1 = "netsh wlan show profile" cmd2 = "netsh wlan show profile name={wifi} key=clear" def get_wifi(): # 执行 查看wifi列表 命令 reslut = subprocess.run(cmd1.split() , capture_output= True,text=True) if reslut.returncode == 0: output_lines = reslut.stdout.split("\n") # 获取到所有wifi的名称 wifi_profiles = [ line.split(":")[1].strip() for line in output_lines if "所有用户配置文件" in line] for wifi_profile in wifi_profiles: # 查询每个wifi的密码 cmd = cmd2.replace("{wifi}", wifi_profile) wifikey = subprocess.run(cmd.split() , capture_output= True,text=True) if wifikey.returncode == 0: pwds = [line.split(":")[1].strip() for line in wifikey.stdout.split("\n") if "关键内容" in line] for pwd in pwds: print(f'WIFI: {wifi_profile},密码{pwd}') else: print(f'WIFI: {wifi_profile} 获取失败') else: print("获取WIFI配置失败") if __name__ == '__main__': get_wifi()
-
Python 调用执行js代码库 execjs ## 介绍 execjs库的作用和重要性是在Python中执行JavaScript代码。它允许开发者在Python环境下调用JavaScript逻辑和功能,从而实现Python与JavaScript之间的交互。通过execjs,Python开发者可以利用JavaScript的强大功能和现有库,拓展Python应用的能力,实现跨语言的灵活互动,以及进行前后端开发的联动与测试。因此,execjs在Python开发中具有重要的功能和价值。安装PyExecJSpip install PyExecJS -i https://pypi.tuna.tsinghua.edu.cn/simple/创建1.js文件function foo(num){ return num*100; }创建1.py文件 import execjs # 读取js代码 with open("1.js") as f: js_code = f.read() f.close() # 对js代码编译 js_compile = execjs.compile(js_code) # 调用 js_compile.call("函数名",参数) ret = js_compile.call("foo",12.12) print(ret)执行1.py文件
-
Mac下 Python 使用Py2app编译wxpthon程序 介绍Py2app是一个用于将Python脚本转换为可执行应用程序的工具,可用于Mac OS 操作系统上它允许您将Python应用程序和所有依赖项捆绑在一起,创建一个独立的应用程序,而无需安装Python或任何其他库.使用Py2app,您可以将Python编写的应用程序转换为Mac应用程序,这样用户就可以像使用其他应用程序一样使用您的应用程序安装pip3 install py2app可能下载其它依赖包,如:altgraph>=0.17.3, modulegraph>=0.19.3,以及macholib>=1.16.2和setuptools等使用py2applet --make-setup 1.py1.py 是你的程序文件import wx class MyFrame(wx.Frame): def __init__(self, parent, title): wx.Frame.__init__(self, parent, title=title, size=(300, 200)) self.panel = wx.Panel(self) self.button = wx.Button(self.panel, label="Click Me") self.Bind(wx.EVT_BUTTON, self.on_button_click, self.button) self.Show(True) def on_button_click(self, event): wx.MessageBox('Hello wxPython', 'Message', wx.OK | wx.ICON_INFORMATION) app = wx.App(False) frame = MyFrame(None, 'Hello wxPython') app.MainLoop()这时,控制台会出现 Wrote setup.py 。这就代表.py文件的设置文件写成功了目录下出现 setup.py 编译python3 setup.py py2app -A成功后会出现 build 和 dist 文件夹打开 dist 文件夹,即可看到我们的程序 1.app 。双击运行就可以了运行成功
-
Python 闭包函数与装饰器 闭包函数''' 闭包函数是函数内部定义函数 构成条件 1 函数中嵌套一个函数 2 内存嵌套函数 对外部作用域有一个非全局变量的引用 3 外出函数的返回值是内层函数的函数名 作用 保证局部信息不被销毁 数据的安全性 应用 1 保存一些非全局变量 但是不易被销毁、改变的数据 2 装饰器 3 实现数据锁定 ''' # def outF(): # sum = 2 # 定一个非全局变量 # def inF(n): # return sum+1 # # #外出函数返回值是内层函数的函数名 # return inF # def outer(): # n = 10 # def inner(): # n = 20 # print("in",n) # print("ou",n) # inner() # outer() # 闭包函数 def outer(m): n = 10 def inner(): print("in",(n+m)) return inner ot = outer(9) # 调用 ot() #>>> in 19 def a(a): def b(): nonlocal a # 给外层函数变量声明 a += 1 print(a) return b fn_a = a(20) fn_a() #>>> 21 装饰器{tabs}{tabs-pane label="装饰器"} ''' 装饰器的功能 1 函数执行时间统计 2 可以用在框架的路由传参上 3 插入日志 4 事物处理 5 权限娇艳 6 缓存 ''' ''' 装饰器的使用方法 1 先定一个装饰函数(帽子) 2 再定义一个业务函数(类) 3 把帽子带上 装饰器的语法糖用法: @装饰器名称 @intro 相当于 hello = intro(eat) 为eat函数装饰并返回 ''' # 标准装饰器模版 def wrapper(func): # func 业务函数 def inner(*args,**kwargs): res = func(*args,*kwargs) return res return inner{/tabs-pane}{tabs-pane label="使用装饰器(1)"}# 装饰器 def logger(func): def wrapper(*args): print('我准备开始计算{}函数了'.format(func.__name__)) # 真正执行的业务函数 func(*args) print("计算完类") return wrapper # 第一种方法 def add(x,y): print("{} + {} = {}".format(x,y,x+y)) # 使用装饰器来装饰函数 # 把函数名add作为参数传入装饰器 fun = logger(add) fun(1,2) ''' >>> 我准备开始计算add函数了 1 + 2 = 3 计算完类 '''{/tabs-pane}{tabs-pane label="使用装饰器(2)"}# 装饰器 def logger(func): def wrapper(*args): print('我准备开始计算{}函数了'.format(func.__name__)) # 真正执行的业务函数 func(*args) print("计算完类") return wrapper # 第二种方法 # 使用语法糖 @logger def add(x,y): print("{} + {} = {}".format(x,y,x+y)) add(11,4) ''' >>> 我准备开始计算add函数了 11 + 4 = 15 计算完类 ''' {/tabs-pane}{/tabs}
-
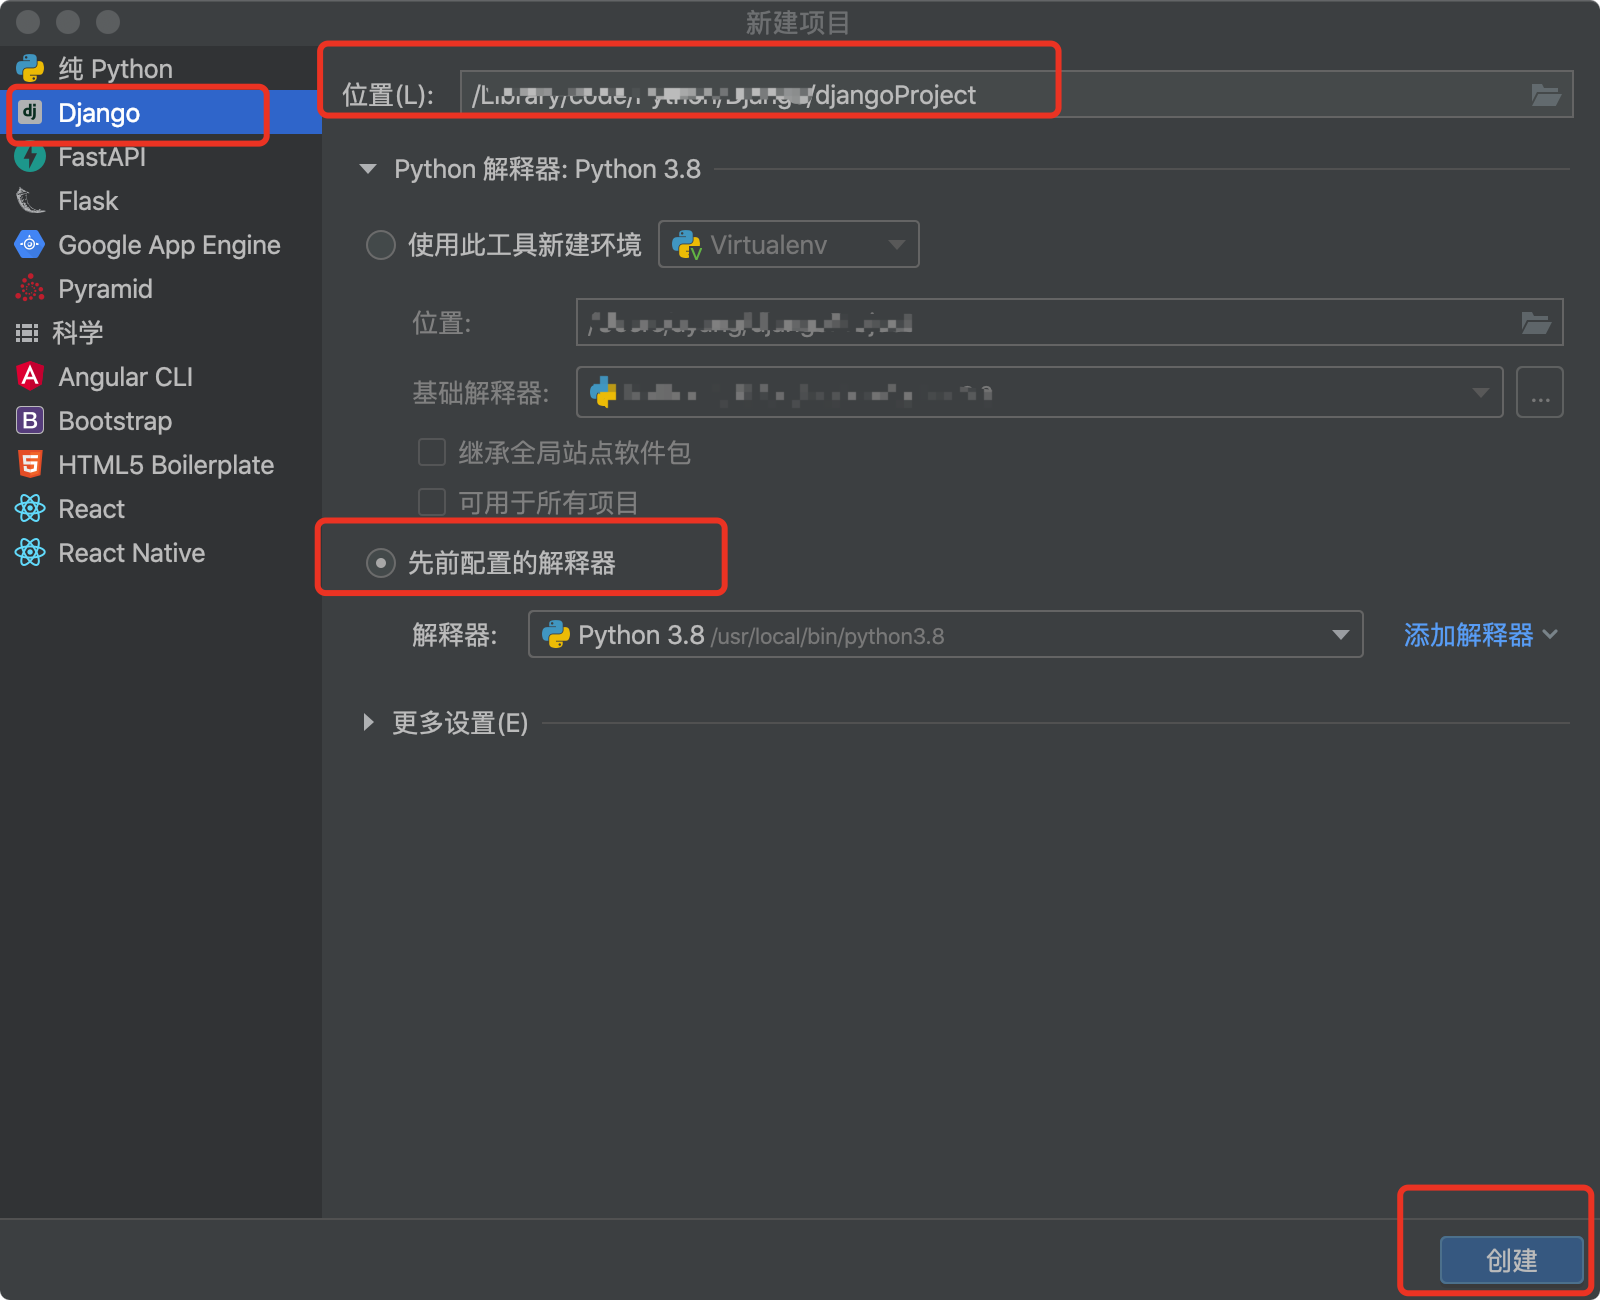
Python 安装使用Django创建项目 1. 安装Djangopip install Django -i https://pypi.tuna.tsinghua.edu.cn/simple/2.1 使用Pycharm创建项目2.2 使命令创建项目(不推荐)django-admin startproject test3. 编辑一个路由在 urls.py 文件中添加一个路由# urls.py # ... from django.shortcuts import HttpResponse def login(request): return HttpResponse("test4 login") urlpatterns = [ path('admin/', admin.site.urls), path('login/', login), ] 4. 启动运行1.点击右上角的运行按钮 运行 manage.py 2.访问 http://127.0.0.1:8000 可以访问到项目首页3.访问 http://127.0.0.1:8000/login/ 可以访问到自定义的路由5. 在项目中创建APP一个项目中不能的功能区分,可以创建不能的Apppython manage.py startapp app名称 python manage.py startapp admin python manage.py startapp user python manage.py startapp buy文件目录解析├── app │ ├── __init__.py │ ├── admin.py 内置后台管理的配置 │ ├── apps.py App的名字 不要动 │ ├── migrations 迁移记录 自动生成 │ ├── models.py 数据库 类-〉Sql【经常使用】 │ ├── tests.py 单元测试 │ └── views.py 视图函数【经常使用】 ├── db.sqlite3 ├── manage.py 项目管理文件 ├── templates └── test4 ├── __init__.py ├── asgi.py 异步运行项目 ├── settings.py 项目配置文件 ├── urls.py 根路由 URL和函数对应关系 └── wsgi.py 同步运行项目{lamp/}